VPN Routing Guide
By default, Every Proxy acts as a gateway to whatever internet connection your Android device is currently using. If you have an active VPN on your phone, Every Proxy will automatically route your client's traffic through that VPN tunnel.
The Goal: Extend VPN Coverage
Use Every Proxy to provide VPN-protected connectivity to devices that lack native VPN support, such as game consoles, smart TVs, or IoT hardware.
This is also an effective solution for managing local network traffic when your carrier's default hotspot routing does not support your specific VPN configuration.
How it Works
Every Proxy operates at the Application Level. When a VPN is active on Android, the system creates a virtual network interface. Every Proxy simply hands its traffic to the Android OS, which then pushes it into the VPN tunnel.
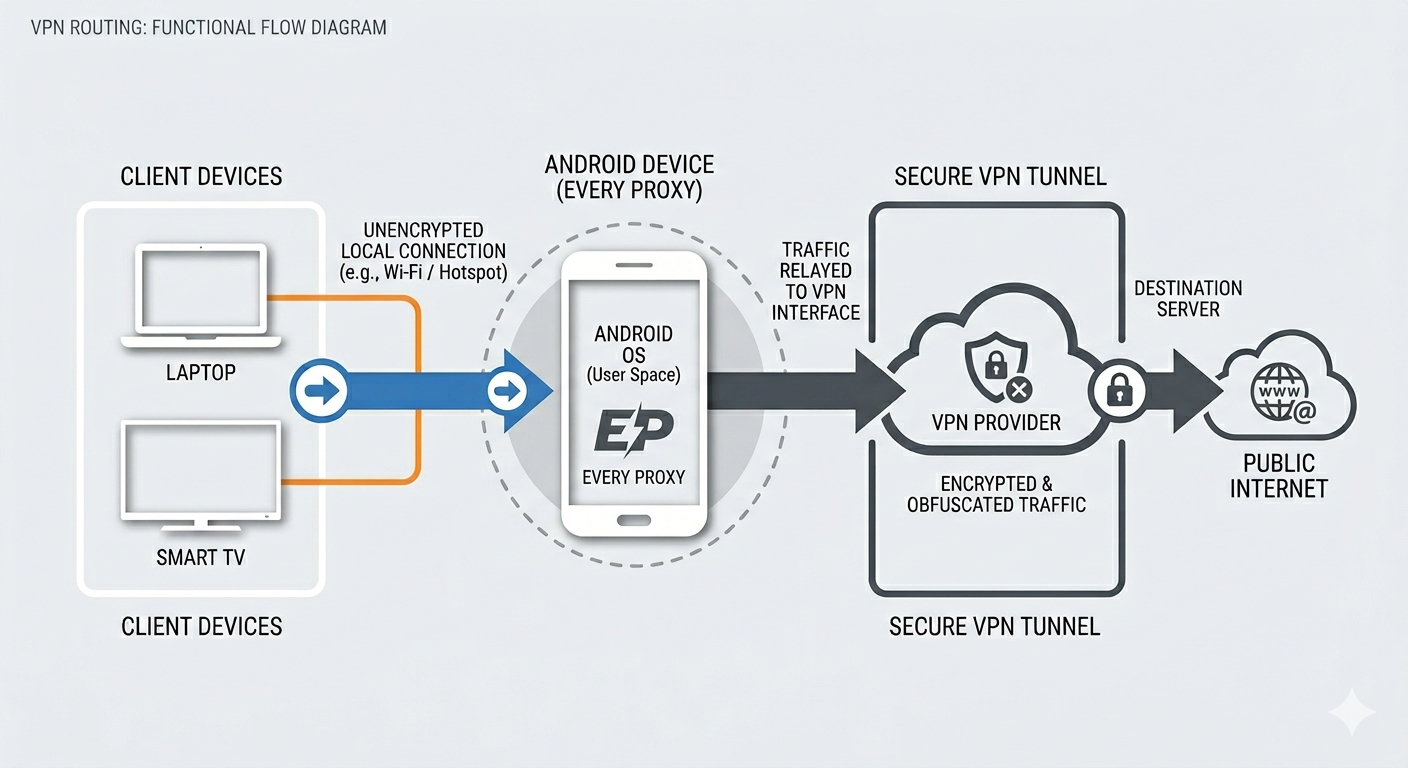
The Traffic Path:
Client Device → Every Proxy → Android VPN Tunnel → VPN Provider → Internet
Setup Instructions
Getting your VPN traffic to flow to your other devices is straightforward and requires no special settings inside Every Proxy.
- Connect VPN: Start your preferred VPN app (e.g., WireGuard, Mullvad, or OpenVPN) on your Android device.
- Verify Connectivity: Ensure you can browse the web on the Android device itself while the VPN is active.
- Start Every Proxy: Enable your HTTP or SOCKS proxy.
- Connect Client: Point your laptop or tablet to the IP and Port shown in Every Proxy.
Automatic Routing
You do not need to change any settings in Every Proxy to enable VPN routing. If the phone is "on the VPN," the proxy is "on the VPN."
Important Considerations
DNS Leak Prevention
To ensure your DNS requests also go through the VPN:
- Use SOCKS5: SOCKS5 allows the client to pass hostnames (like
mysite.com) to the Android device to be resolved inside the VPN tunnel. - Avoid SOCKS4: SOCKS4 often forces the client to resolve DNS locally, which can bypass your VPN and leak your real location.
Kill Switch Behavior
If your VPN app has a "Kill Switch" enabled and the VPN connection drops, Every Proxy will likely lose internet access as well. This is intended behavior to prevent your real IP address from being exposed.
Encryption
- Android to Internet: Encrypted by your VPN provider.
- Client to Android: Not Encrypted by the VPN. This connection happens over your local Wi-Fi/Hotspot. For sensitive data, ensure you are using HTTPS or a secure local network.
Advanced: Per-App VPN Routing
Some VPNs allow you to select which apps use the VPN and which don't (Split Tunneling).
- If you exclude Every Proxy from your VPN, it will use your "real" IP address.
- If you need proxy traffic to follow complex per-app rules, you may need the Every Proxy Network Bridge.
Learn more about the Network Bridge
Troubleshooting VPN Connections
VPNs can sometimes be restrictive with local network traffic. If your client device cannot connect while the VPN is active, check these common settings:
- Allow Local Network: Many VPN apps (like Mullvad or Tailscale) have a setting called "Allow LAN traffic" or "Local network sharing." This must be enabled for your client to reach the phone.
- Kill Switch: If your VPN is set to "Block connections without VPN," it might prevent Every Proxy from initializing its listening ports correctly.
Looking for more help?
For a complete list of connection fixes, IP conflicts, and device-specific settings, visit our Troubleshooting Guide.